 As you may know, Facebook recently changed the format of personal profile pages, moving to the new Timeline page design. This change will soon apply to business pages as well. The new Facebook business page design, which is virtually the same as Timeline, is now available for all businesses to implement on Facebook pages!
All business pages will be required to convert to the new format on March 30, 2012. In the meantime, page administrators can preview and play around with the new design without publishing, or have the option of publishing their new design immediately.
Here’s what you need to know to make the most out of the new design and all the features it has to offer. Along with our overview here, take some time to check out Facebook’s overview of the new design.
After logging in and accessing your business page, you may be prompted to access a preview of your page, with a message that looks like this:

Click on the green “Start Tour” to get started. If the prompt doesn’t appear, you can access the tour at https://www.facebook.com/about/pages to preview your new page layout.
1. Add a Cover Photo
You’ll be prompted to choose a “cover” photo for your page (this is similar to the cover photo on your personal profile timeline). You can use a photograph here, or create a custom banner — this is a great place to get creative with your page. The dimensions of the cover photo are 851 x 315 pixels. You can see what Big Splash did for some of our clients’ cover photos at the Eric Kleiman Photography and Got To Have It Boutique Facebook Pages. Before designing your cover image, it’s important to be aware of Facebook’s policies regarding cover photos.
Cover photos cannot include:
- Price or purchase information, such as “40% off” or “Download it at our website.”
- Contact information such as a website address, email, mailing address, or information that should go in your Page’s “About” section.
- Calls-to-action, such as “Get it now” or “Tell your friends.”
- Covers must not be false, deceptive or misleading, and must not infringe on third parties’ intellectual property.
2. Add Your Profile Picture
This is the standard profile picture, which will appear with all your posts, and will also appear with any sponsored stories or ads you run. Your logo is a good choice, but you can use any image that’s representative of your brand. You’ll need an image that fits 180 x 180 pixels and also looks good when scaled down to a thumbnail size of 32 x 32 pixels.
3. Configure Your Ads and Apps
The new design features photos, likes, and apps at the top of your page below your cover photo. Photos are automatically featured in the first spot, but page admins can rearrange the rest to feature the most important ones first. Overall, a total of 12 apps can be shown here, which can be viewed when page visitors click the dropdown arrow (highlighted in orange in the image below). Admins can also customize the images that get shown for each app in this toolbar using the ‘Manage’ >> ‘Edit Page’ dropdown via the ‘Admin Panel,’ which is accessible at the top right of their business page.
The new page layout displays featured photos, Likes, and apps below your cover photos. Photos are, by default, featured in the first slot, but the remaining featured items can be arranged to suit your preference. Begin by choosing your featured apps by using the Admin Panel (top right of the page), then click on Manage>>Edit Page, then click on Apps on the left sidebar. Once you’ve chosen your features, you can set the order:
Locate the drop-down arrow to the far right of the featured thumbnails, to the right of Photos and Likes. The drop-down arrow will have a number 1, 2 or 3 next to it.
Hover your mouse over the thumbnail box you want to set, then click the pencil icon in the upper right of the thumbnail. A drop-down will display the apps and features you’ve chosen, so choose the one you want to appear in the current box, and click it to set it for that featured slot. Repeat for the remaining thumbnail boxes.
4. Star, Hide or Pin
For the next step, Facebook will prompt you to modify the items in your page’s timeline. Hover over individual stories to make them wider, hide them from your timeline (by using the pencil icon to edit), use the star icon to highlight them as important, or delete them entirely. A great new feature to note here is that you can pin/anchor a specific story to the top of your timeline for up to 7 days. This means you can highlight specific posts such as remarkable content, calls-to-action for your best marketing offers, or other events/promotions you want to feature. Pinning it to the top of your page will prevent it from getting buried by more recent updates. Since the cover photo policies prohibit promotional messages, this pin feature offers you the flexibility to keep marketing messages visible.
5. Check Out The Admin Panel
The admin panel allows admins to edit page settings, access Page Insights (analytics), create new ads, and respond to comments. This is the place to track all activity on your page in one convenient place. To access the admin panel, find the Admin Panel button at the top right of your business page.
6. Private Messages
This is a new feature for business pages, and gives admins the ability to allow users to send them personal messages. With this new feature, admins can have private conversations with fans/customers, such as discussing a specific topic, addressing a customer service issue, or just chatting outside of public view. If this feature is not appropriate for your business, messaging can be disabled by going to the Admin Panel, then choosing Manage>>Edit Page>>Manage Permissions, and unchecking the Messages box.
Other New Facebook Timeline Features for Business Pages
About — This is not a new feature, but is placed more prominently in the new design — below the cover photo, and next to your featured items. Take this opportunity to let your visitors know about your business. The allocated space does have a character limit, so keep your description brief enough that it doesn’t get cut off, and remember to include a URL to your business website so it’s prominently displayed.
Friend Activity — Social interaction is now more personalized, because visitors will now see how their personal Facebook friends have interacted with your page. If a visitor to your page sees that he or she has friends who have also interacted with your page, they will hopefully be more inclined to become fans as well. Learn more about your page’s visibility settings and what people can see. (add links)
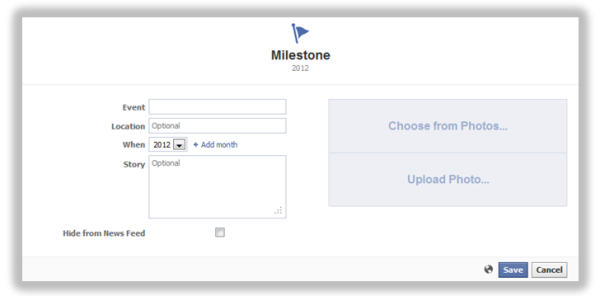
Milestones — Highlight major events and turning points in your business with the Milestones feature, located to the right of the Status option in the Highlights area. Create a new (or past) milestone using the status update box, which will prompt you to input the following information about your milestone.

Activity Log — This features allows you to view, manage, and organize all posts on your page. Here, you can filter stories by date or story type (see “All”), view spam vs. photos vs. comments vs. posts by others, and the list goes on. From this view, you can also hide, delete, or star (highlight) individual stories, as well as change dates of stories on your timeline. To access the activity log for a page, page admins should visit their Admin Panel and click ‘Manage’ >> ‘Use Activity Log.’
Additional Notes About The New Facebook Timeline Design
- Since this new design is highly visual, make good use of the best visual content you’ve got — photos, banners, infographics, etc.
- If you have a Custom Facebook Page, be aware that you can no longer set a default landing tab for your business page. All new traffic will go directly to your timeline. However, remember that you can spotlight any apps on the featured toolbar (see Step 3 above).
- Keep your important content prominent. Manage>>Edit Page>>Manage Permissions>>Everyone can post to (your page). To display a post prominently (the full width of the timeline), access your Activity Log and select Highlight on Timeline to star a specific post.
- Pin new featured posts regularly. Remember to anchor prominent posts at the top of your page, where they’ll stay visible on your page for 7 days. (See Step 4 above.)
Take the next few weeks to experiment with your new page settings before publishing it. You can also take a tour of the new, updated Big Splash Web Design Facebook page to see how the new features work.
For more information, check out some additional resources available from Facebook:
Interactive Course on Facebook Pages
Or, contact us to let us know how we can help.

