Let Your Audience Decide
If you’re a marketer, chances are you probably like data. A lot. Data that tells you what people want, what links they click, what pages they visit, how long they stay and helps you make decisions. Without data, you’re left to follow your gut instinct – which is a fantastic plan, if you are an exact replica of your audience (in which case, your gut is probably right). If you’re *not* your audience, you might want to try this instead: A/B Split Testing!
A/B Split Testing for email marketing lets your test your two favourite options for one element of a campaign – email from name & address, email subject line, or your email’s content – with a real audience, and then takes care of sending the most successful version to the rest of your list.
Since this great new feature is part of the all-new Big Splash Mail, we thought we’d give you a little walk through to show how easy it is to set up and run an A/B Split campaign.
Create A New Campaign

To get started, you’ll want to log in to Big Splash Mail and click on the “Campaigns” tab. This is where you’ll create all of your email campaigns, and also where you can access easy reporting.
Click on new campaign, and select the A/B Split option from the list the pops up.
The first thing you’ll be asked to do to set up your campaign is to select the contact list you want to use for your A/B Test campaign. If your contacts have already been uploaded, you can just select it from the list, or click “Create Contact List” to add your contacts to a new one.
Setting Test Parameters and Creating Content
With your contact list selected, you get to dive straight into the best part in Step 2 – selecting what to test on – and deciding what size your sample groups will be (and of course, how to determine which option is the winner!). You can set your test up for two different Sender Names / Sender Emails, two different subject lines, or different email content.

To select the test groups, click on and move the slider until groups A and B are the size you’d like – 20% is typically a good default for each A or B test as it leaves 60% of your list to receive the winning email, but this always depends on the size of your list.
To determine the criteria for the “winner” you can choose between the email that’s opened the most, or the email that has the highest click rate (shown above as Most clicks). Set the length of your test period (or how long you’re willing to wait before the winning email gets selected) to be anywhere from 1 hour to 7 days. As soon as that time period is up, whichever email is in the lead based on the criteria you selected will be sent to the remaining portion of your list.
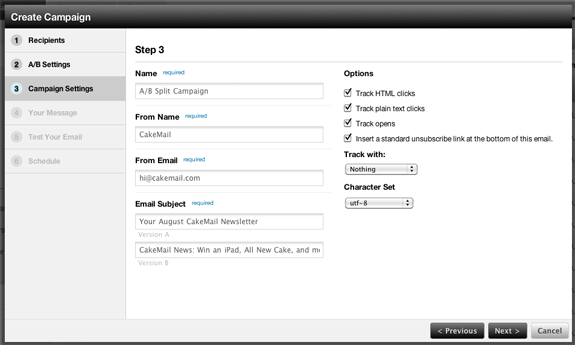
Now you get to start creating your content. If your test is based on subject lines, or sending names / emails, you’ll add your Version A and Version B text in Step 3 (Campaign Settings). Below is an example of an A/B Split Test we set up to test two different subject lines for a Big Splash Mail newsletter:
Once you’ve set up all of the details & settings for your campaign, it’s content time! This example of Step 4 shows what content entry would look like with just one content version when you’re running a test on subject lines or from information. If you were running your test on content, you’ll have four options – HTML A, HTML B, Plain Text A and Plain Text B.
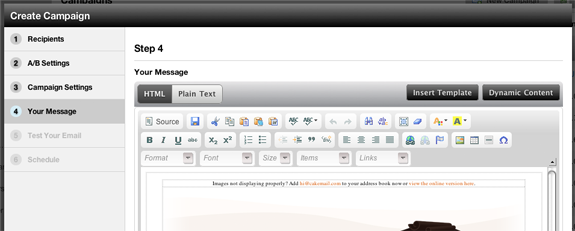
There are a few ways to build your campaign content – you can use our built in WYSIWYG editor, import a template from your template library, or cut and paste the HTML code from an external file.
Testing & Scheduling
Once your content is created, your settings are all set, it’s time to send some quick tests (Step 5) to make sure that your emails look great, links point to the right places, and there are no obvious issues with spam filters or content that might prevent your email from getting delivered.
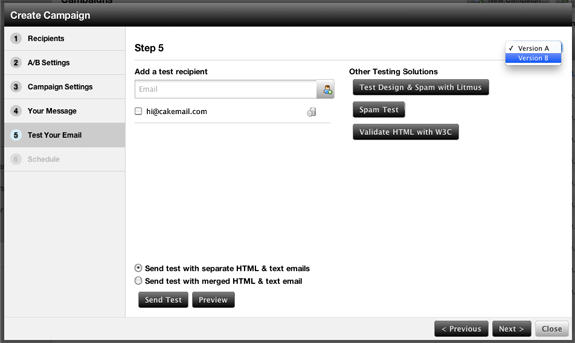
Basic testing is available by default and lets you add a test recipient to send a copy of your email to. Choose which campaign (A or B) you want to send from the drop down menu, and select whether you want to send an email with merged HTML & Text or two separate emails. Click “Send Test” and check that inbox!
Extra functionality like Litmus Design & Spam tests to flag any content that might cause issues and test your email’s design in a variety of email clients can also be used. It goes a long way towards making sure that your campaign looks great in every email client, and you can add this service to your account from the Marketplace for an additional monthly fee.
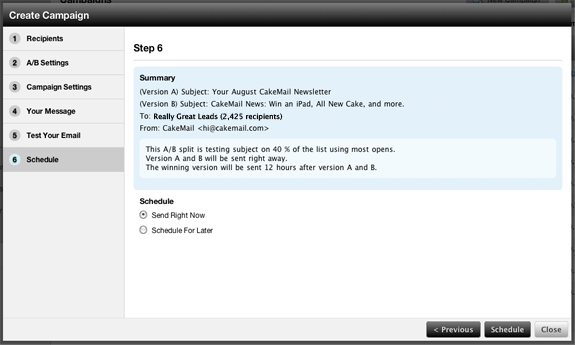
Tests perfect? Ready to send? Step 6 goes over all of the important last minute details before you schedule your campaign to send at a later date, or schedule it to Send Right Now. Select the right details, hit Schedule and that’s it! Now you can just lean back and relax, but don’t count on taking it easy for long – the minute your campaign is sent there are reports to check on!
After You Hit Send

Once you’ve sent your campaign, you are able to view reports for campaign A and campaign B, keeping tabs on clicks and opens, and monitoring which one is in the lead.

Of course, watching the results come in is great, but if the full length of time for your test hasn’t elapsed yet and you can already see a clear winner (or you just want to override the testing and send your favorite version), you can click on the “Pick A Winner” button in your report and your campaign will send immediately instead.
With your winning campaign heading to the inboxes of the rest of your list, you’re now able to take a look at reports for each part of the campaign – tests A & B along with the final results.
That’s it! We’ve just created an A/B Split Test Campaign from start to finish. Now that you know how to run one yourself, you just need to decide what you want to test. Here are some quick ideas for experiments you could run:
- What subject lines work best? Is a hard sell effective? What about a special offer?
- Should your subject line include a date? Be short and sweet? Be long and descriptive?
- Should your company newsletter come from a real person’s name? Your company name?
- What if you change the layout of your email? Is one column better? Two? Text? HTML?
- How effective is your new template design versus the old version?
These options are just the beginning for tests you could run with this new feature. Have you already seen great A/B Split Test results? Leave a comment below to share your success!

